
Trying to understand how a map relates to what’s on the ground can be tricky. It requires the brain to do a lot of stuff that it doesn’t customarily do daily. This is one of the reasons that developing good navigation skills is an excellent brain-training skill.
Mastering map and compass skills promotes you from casual walker to explorer. While apps are handy, what happens if your phone runs out of battery or loses signal? Knowing how to navigate the old-school way isn’t just a backup plan — it’s a core skill for planning safe winter hikes and finding your way in the dark.
This guide will get you familiarised with a map and compass, teaching the basics of how to navigate with them, laying the foundation for you to head out and practice and hone your navigational skills.
How navigation makes you a genius
Once you start to connect the map with the landscape, you will start to see how they relate to each other. Imagine you’re a musician: the map is the sheet music; the landscape is the symphony. If you can learn to read the music, you can start to play.
Most regular walkers may have an idea about the basics of understanding the map. But most of the time we are following someone else’s route, or relying on an app to do the work for us. That‘s fair enough, but to get the most out of your map, you might want to try creating a route yourself. And that’s when the symphony really starts.
Reading a map and following a route makes us use a process called cognitive navigation. It’s the ability to see the big picture and to change as it changes. You’re thinking past, present and future all at once: where have we come from, where are we now, and where are we going?
And you’re translating graphics on paper (or a screen) to the real world, which forces your brain to make complex connections very quickly. So navigating is a great way to keep your brain active and healthy.
And here’s my favourite bit: navigation has been officially identified as the highest cognitive function of the human brain. The people who proved that won the Nobel Prize for Physiology in 2014. So if you can engage that side of your brain, then you’re doing something extraordinary.
Getting to know a map
The UK is one of, if not the best mapped country in the world, with every crinkly edge, wandering river and twisting highway covered in remarkable detail. And depending on what you need one for, maps come in various scales and sizes, from road atlases to detailed street maps.
But of course, the key is knowing what everything on a map means...
Map scales and distance

Scale is the ratio of distance on the map to distance in the real world and most walkers prefer 1:25,000, with every 4cm on paper representing 1km on the ground. At this scale, maps cover a large area in ample detail. The Ordnance Survey Explorer and Harvey Superwalker series are examples of 1:25,000-scale maps.
At the bottom of every OS map, the scale bar (like the one above) shows metres, kilometres and miles. For navigation, it’s easiest to think in metric distances and heights, as every grid square is 1km x 1km and heights are shown in metres.
Map legends and symbols
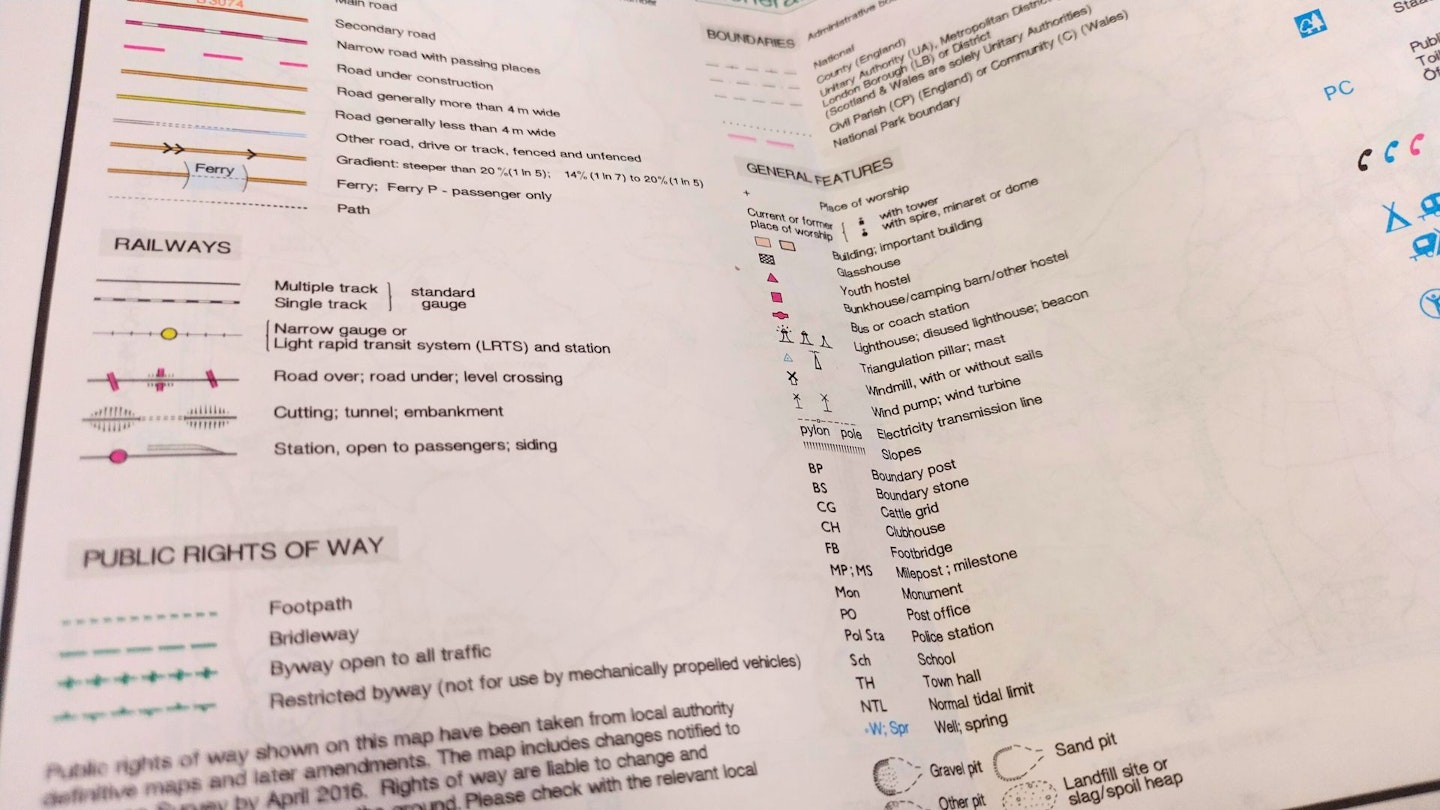
On every paper map there’s a legend – the key to every line and symbol, from manmade linear features like roads and railways, to natural features, buildings and landmarks.
Some are quite obvious in what they represent, but it’s worth familiarising yourself with more obscure icons and letters, like pylons, trig points and footbridges, which can be invaluable.

Rights of way are by far the most useful symbols for walkers. Rights of way are just that – the legal right to move over a route – but there won’t always be a clear path or track to follow on the ground. It helps to recognise permissive routes and access land too.

Terrain features – manmade (like walls and hedges) and natural (like scree and watercourses) – are represented too.
Vegetation symbols can tell you what to expect underfoot, from scrub and bracken to impassable marsh and woodland. It’s vital to know these symbols if you’re navigating off-path. Not only do they highlight hazards, their absence can indicate easier routes avoiding difficult terrain.
Heights and contours
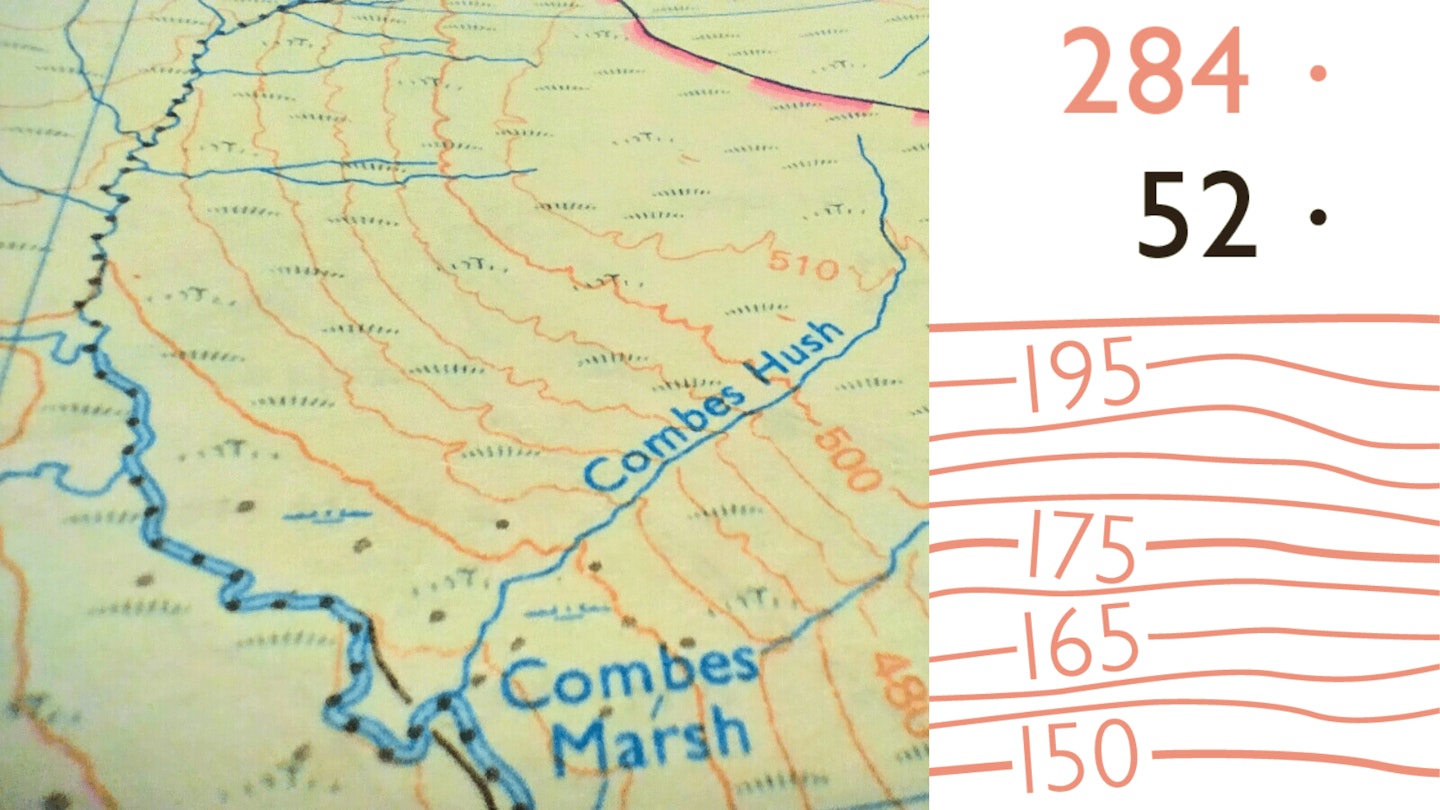
On OS Explorer maps, relief – the rise and fall of the land – is shown by contour lines. These orange-brown lines represent the height and shape of 3D hills and valleys on 2D paper.
They’re spaced every 5 or 10 vertical metres apart depending on how hilly the area is (check the legend to be sure) with thicker lines at 50m intervals. Lines are numbered with their height in metres above sea level, which indicate whether you’ll be walking up or downhill.
The closer together the contours, the steeper the slope. Encircled by contour lines at the top of hills and on prominent spurs, you’ll also see numbered dots called spot heights – either orange (air survey) or black (ground survey). These mark the highest points above sea level.
Grid references
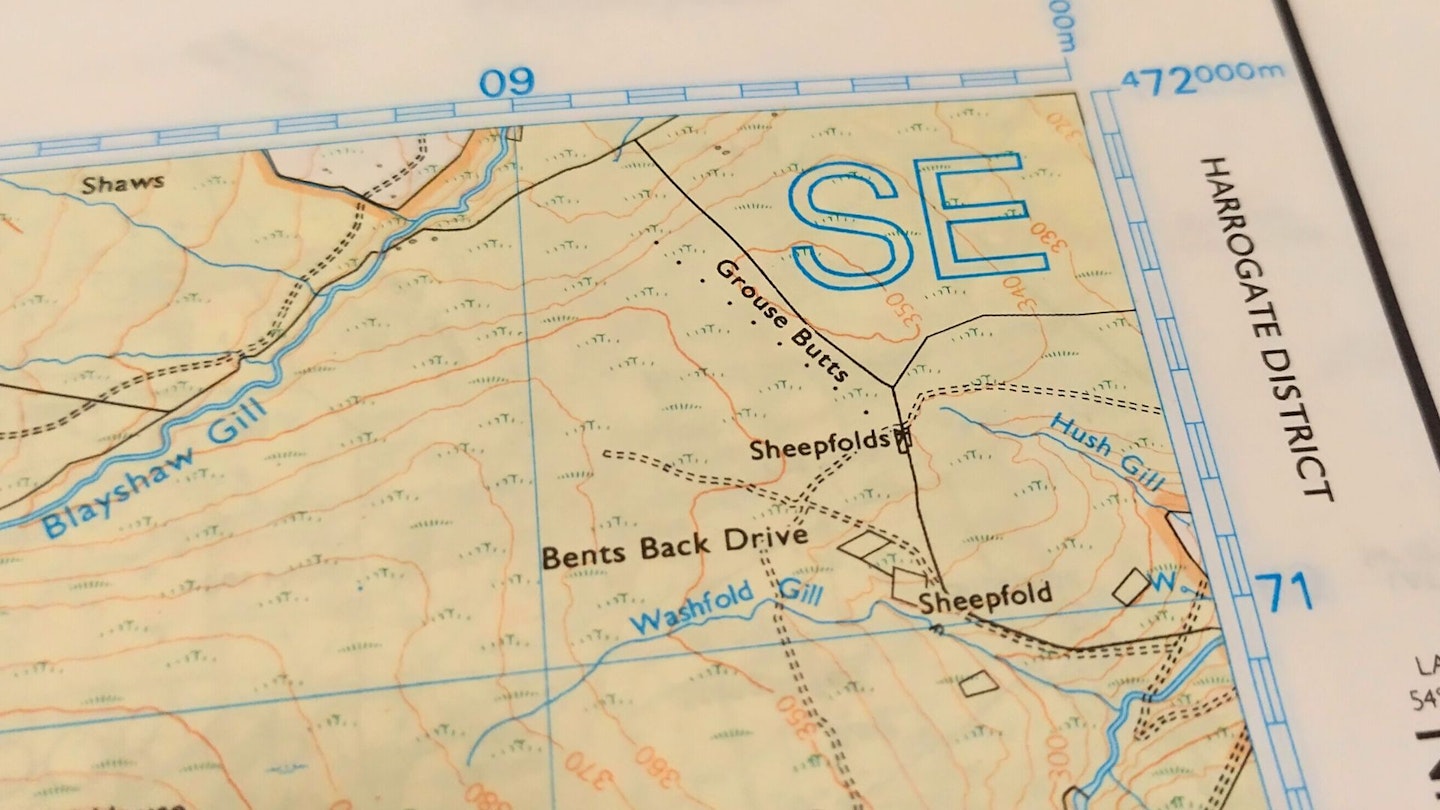
Every Ordnance Survey map is overlaid by a grid of light blue lines marking squares 1km x 1km in size. These squares then make up larger 100 x 100km squares, which are identified by a two-letter prefix, found in the corners of every map sheet. Together these squares make up the Ordnance Survey’s national grid.
The vertical lines are called eastings, with numbers increasing from left to right. The horizontal lines are northings, with numbers increasing from bottom to top. The lines are numbered along the edges of the map, and at ten grid-square intervals across the sheet.
You can use these lines to pinpoint any location in Britain using a grid reference. A six-figure grid reference is usually sufficient, which narrows down a location to an area 100m x 100m.
Reading a grid reference is a bit like playing battleships. Let’s say we want a six-figure grid reference for Washfold Gill in the grid square pictured above:
1. First read off the easting: 092
2. Then the northing: 710
3. Add the letter prefix for the full grid reference: SE 092 710
Footpaths
Footpaths are marked on OS Explorer maps in a number of different ways. Often we’re tempted to rely on the green dashed lines which represent rights of way – the legal right to follow that line on foot.
But the green lines are not always what they seem. A right of way is a legal statute, not a physical feature. You can hope there’s a path there, but there might well not be. To be certain, ideally there needs to be a black dotted line underneath the green dashed line. That is a footpath – and one you can legally walk on, which is ideal.
EXPERT TIP: On an OS map, almost everything in black is definitely visible on the ground, apart from the placenames.
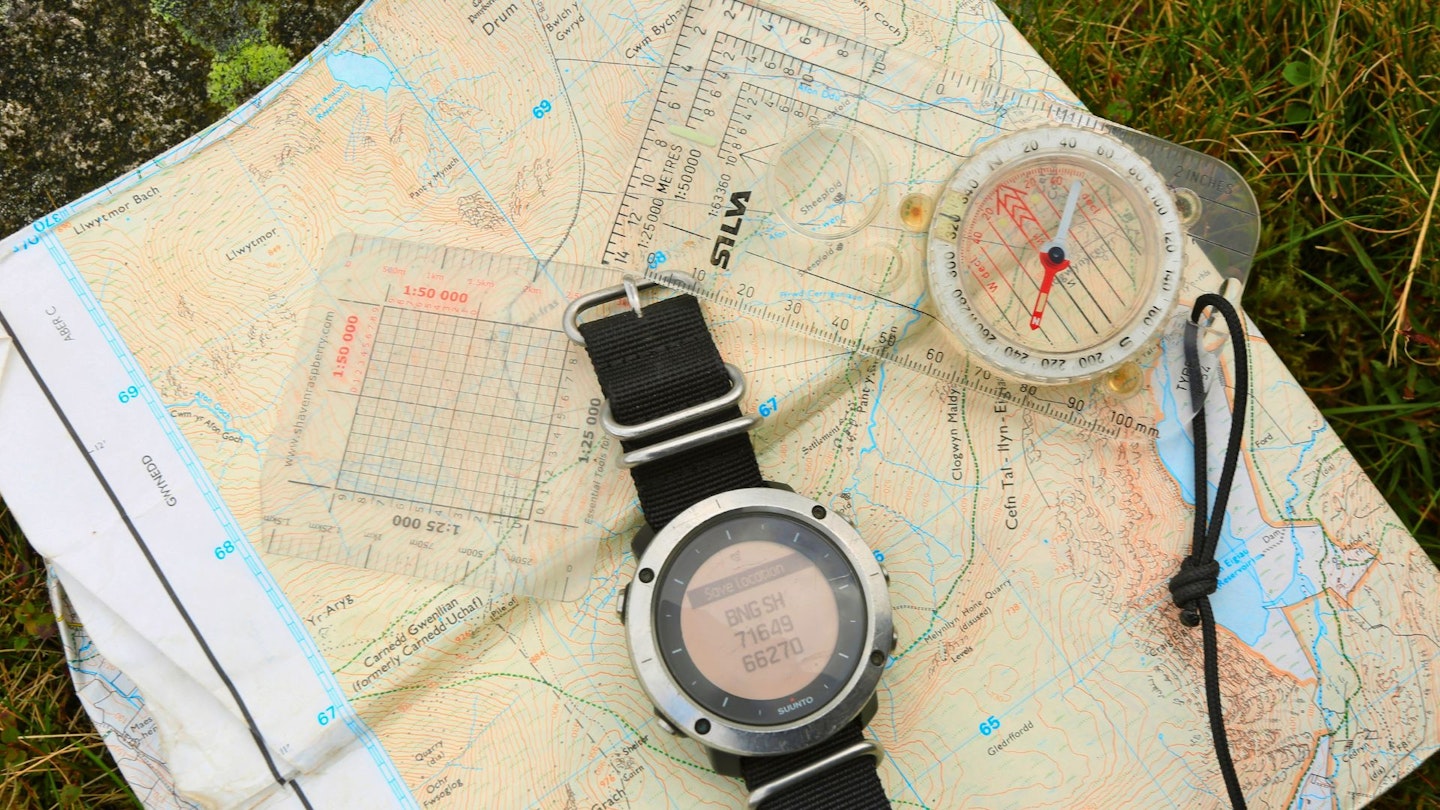
Getting to know a compass
Below is a diagram of the parts of a compass. We'll then explain how to use these to navigate.
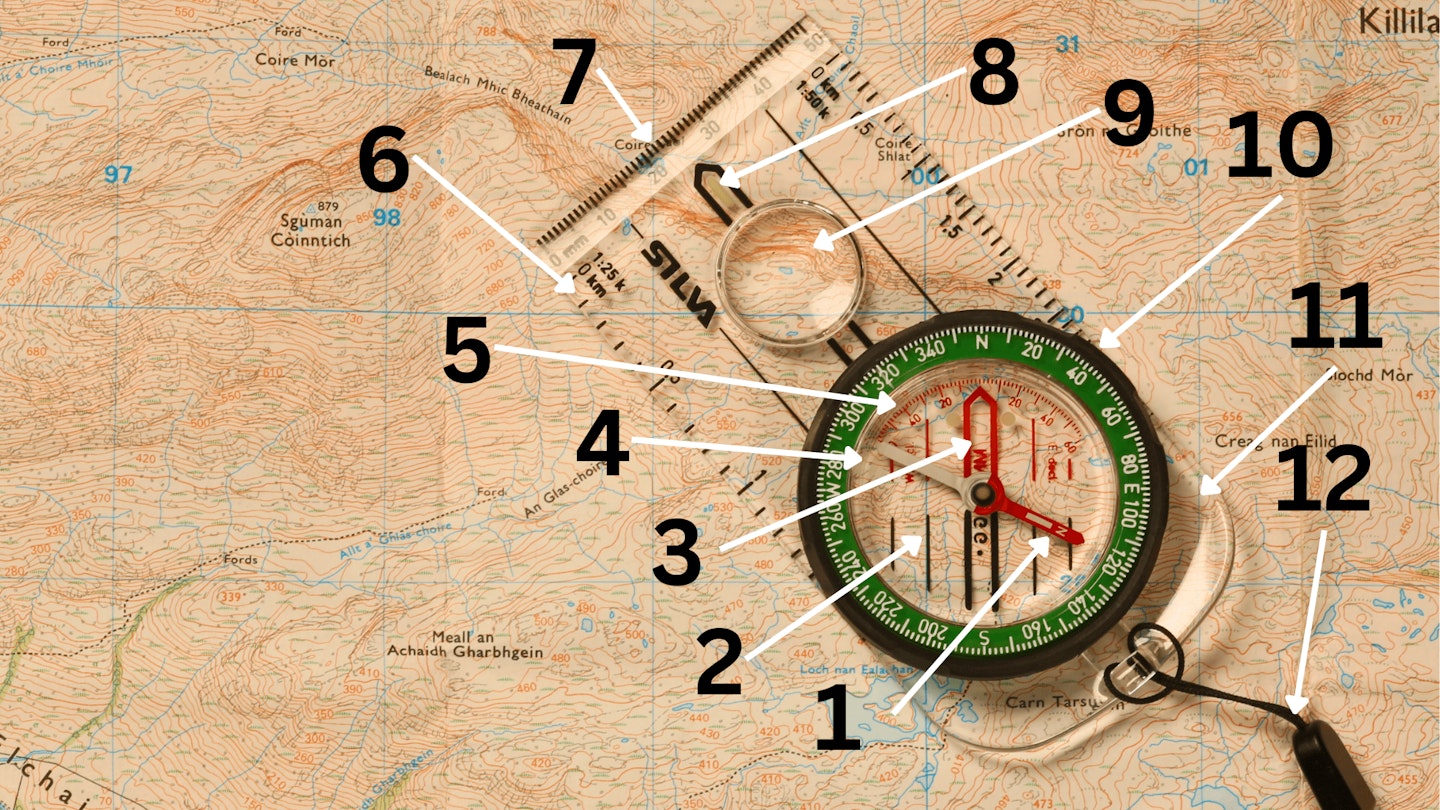
1. Compass needle: Red always points towards magnetic north. The reverse part is often white and can be used to follow a ‘back bearing’ (i.e. going back on yourself).
2. Orienting lines: For aligning with a map’s longitude lines when taking a bearing.
3. Orienting arrow: To align with the needle after taking your bearing to establish your direction of travel.
4. Compass housing/bezel: A disc filled with liquid in which the needle, mounted on a pivot, swings freely. The liquid helps it settle quickly, dampening vibration for an accurate reading.*
5. Declination scale: To correct magnetic declination/variation.
6. Romer scales: Some compasses have ‘romer’ scales for measuring distances or taking six figure grid references.
7. Ruler: For measuring distances on maps of different scales which don’t match the compass’s romer scales.
8. Direction of travel arrow: Indicates the direction you’ll be walking when following your bearing.
9. Magnifying glass: For better viewing of small details like close contour lines, boulders, or crags.
10. Bezel ring: This rotates around the compass housing, marked with the cardinal points and a graduated scale in 2° increments.
11. Baseplate: The plate that the compass is mounted on.
12. Lanyard: For extra security against drops – you really don’t want to lose your compass.
*Bubbles in compass housings are often caused by a contraction in the liquid due to cold temperatures or a rise in altitude. Leaving it on a sunny windowsill at home can solve it, but so long as the bubble is less than 6mm diameter, it shouldn’t affect your compass too much. Observe it when taking a bearing to see if the needle is affected.
How to use a compass and map to navigate
Setting a map
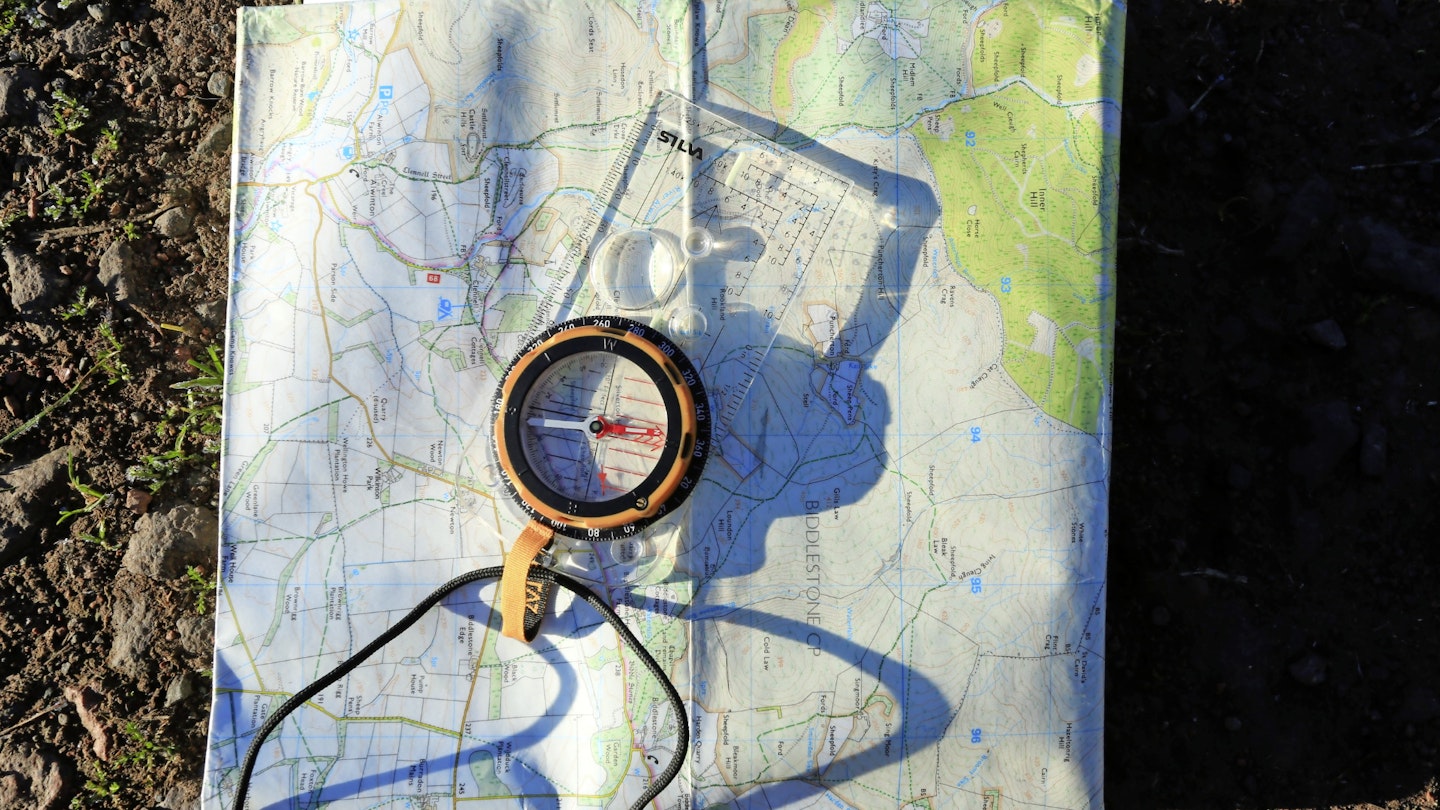
To set a map essentially means lining up what’s on paper with the real world. Whichever way you’re facing, the top of the map should point north – so if you’re walking south, the map will be rotated so the writing is upside down.
It's best to use your compass for this (especially in poor visibility), although you can set a map using obvious landforms, landmarks and linear features like walls and paths if you’re confident of your position.
1. Place and hold your compass on the map.
2. Turn the map until the compass needle is parallel with the map’s vertical grid lines and the red end pointing to the top of the map.
3. With the needle and map aligned and pointing north, the map is now oriented in the direction you’re facing.
How to use a compass to take and follow a bearing
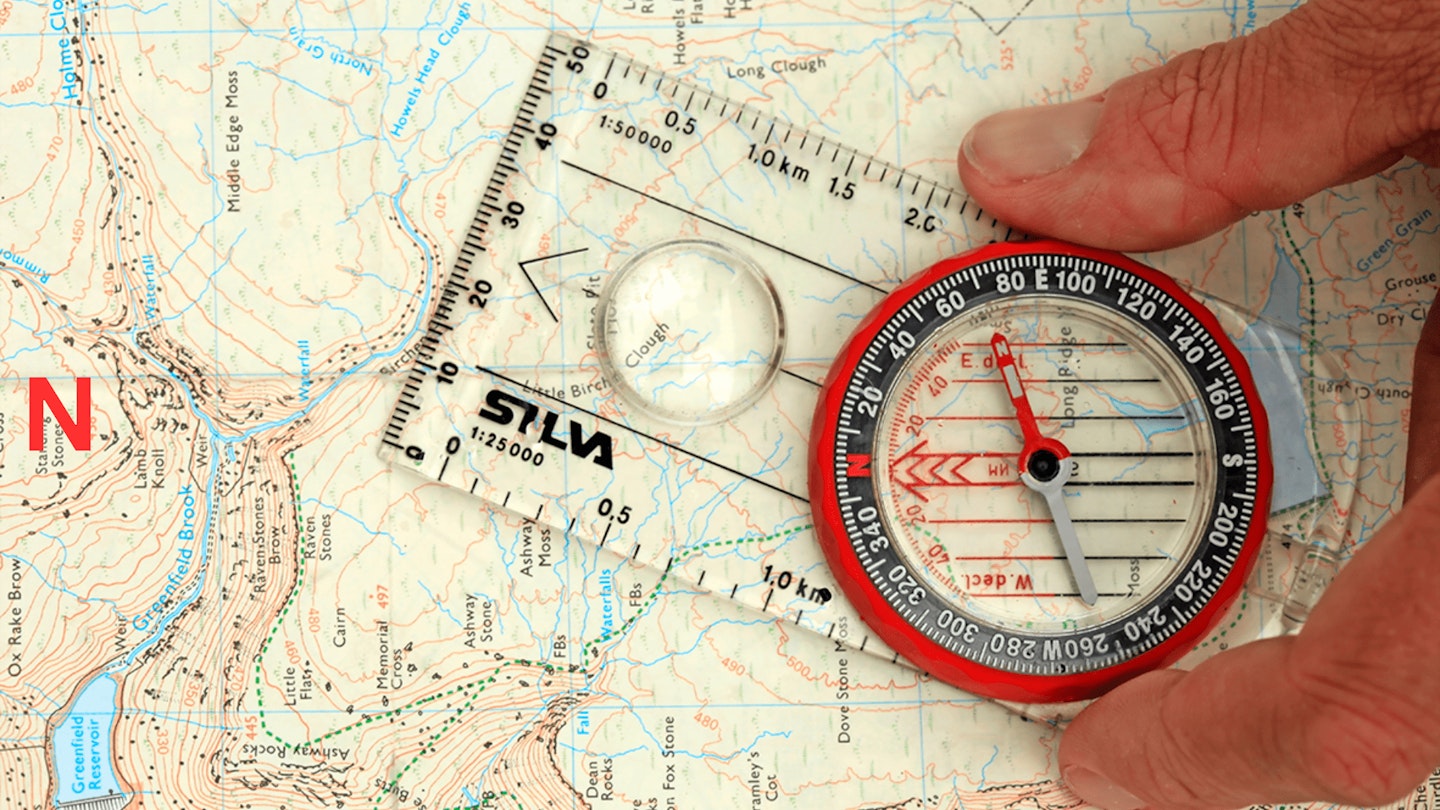
A bearing is the direction from you to your objective (or any given point) and is expressed using degrees. These are the familiar degrees in a circle, where 0° is north, 90° east, 180° south and 270° west. By first looking at your planned course on a map, you can estimate your direction – but to get it bang on, you should take a bearing.
1. Align the long edge of your compass from your location to where you’re going on the map (e.g. point A and B above), with the direction of travel arrow pointing towards your objective on the map.
2. Turn the bezel until the orienting lines are parallel with the vertical (longitude) grid lines on the map, and the orienting arrow inside points to the map’s north.

3. To follow the bearing, lift the compass from the map and turn yourself and the compass until the red end of the needle comes to rest inside the corresponding red orienting arrow. The direction of travel arrow is now pointing to your destination on the ground.
The three norths
There are three different variations of north to take into account when navigating, and here’s what they are.
True north is the direction towards the geographic North Pole, a fixed point on the planet and one of the axis on which it spins.
Magnetic north is the north point of Earth’s magnetic field, which moves over time in relation to changes in the Earth’s core. This is the direction your compass points.
Grid north also known as map north, is indicated by the blue vertical lines on the map. Because mapmakers must try to represent a 3D globe on a flat piece of square paper, this is hard to render exactly.
Beware of magnetic variation! Because magnetic north drifts with time, the magnetic north your compass points to changes too. Variation is the difference between grid north shown on your map and magnetic north shown by your compass.
When magnetic declination is small, you don't need to account for it unless you're micro navigating. But when it's large, you need to compensate for differences between grid and magnetic north using the declination scale on your compass.
First, you need to find out the declination variance from your map. Let's say it's 10° west. Start by taking a bearing as normal using your map, then, holding the compass fixed against your hips, turn your body until the red end of the compass needle points to 10° on the ‘W.decl.’ scale. Twist the compass housing so that the red N arrow on the base aligns with the red N end of the needle again. Then pick a landmark and start walking.
Drift and aiming off
Be aware of drift as you follow a bearing. Over longer distances, it’s better to break your route into short legs, taking several bearings between prominent features.
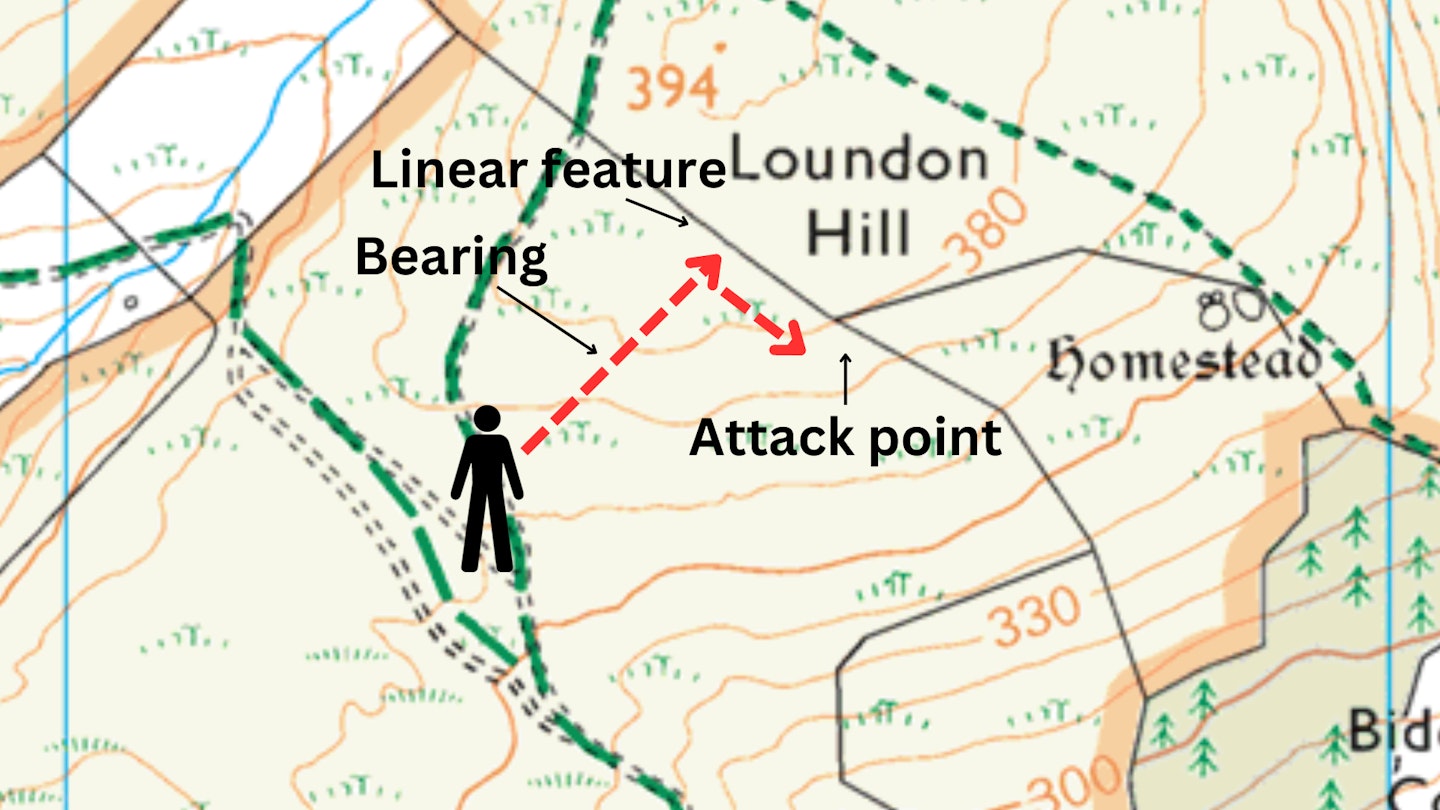
When heading for an attack point in a linear feature, like a gate in a wall or footbridge over a stream, there’s a risk of drifting off course and missing it. By deliberately aiming off to one side of the attack point, you can be certain which side you’ve hit and can follow the wall or stream to your attack point:
1. Identify your attack point.
2. Identify a linear feature and take a bearing to a point a couple of hundred metres to one side of your attack point.
3. When you reach the linear feature, turn to follow it to your attack point.
Wayfinding, planning, and following a route
Route-planning
Good route planning goes hand-in-hand with good navigation. Before you set off, know exactly where you’re starting and work out the best route to your objective on your map.
It helps to mark your planned route in pencil. Consider using a route card too (a list of your waypoints with grid references and distances), and be prepared to adapt your route.
Break your chosen route down into obvious sections, eg village to footbridge; footbridge to farm; farm to road bridge; road bridge to hillside; hillside to village.
Each section has an objective, and to reach each objective, you need The Four Ds.
Destination: An achievable objective, not too far away, that will be obvious when you reach it. For example, a footbridge over a river: a spot feature where two handrails cross (the footpath and the river).
Detail: What features on the map will signpost the way to that destination? What other features exist at the destination to help us confirm we’ve definitely reached it?
Distance: How far away is it? The map shows you Distance all the time: it’s in the grid squares. Normally, it's one kilometre per square.
Direction: And in what direction? This just means setting the map and connecting it to the landscape. Hold the map flat and turn it so that it’s set to the north but you are standing in the direction you want to go (which may mean the map is upside-down, if you’re heading south).
Wayfinding
There's three things you can see on a map that'll help you follow the right path.
-
Primary features: Things in the landscape that won’t change: hills, slopes, rivers.
-
Secondary features: Boundaries (walls and fences), footpaths, roads.
-
Spot features: Single objects that should be clearly visible, like barns, trig points or phone boxes. If it’s a hill-walk, your spot features might include the summit of your chosen hill or mountain.
Then we want to connect them, and to do that we’ll use handrails: features that make it easy because you can see them as you walk in real life as well as on the map.
A river is a handrail, so is a railway line or a drystone wall or the top edge of a line of cliffs. Following them makes it easy to know you’re going the right way. There’s no point in making navigation more difficult than it needs to be when there’s so much there to help you.
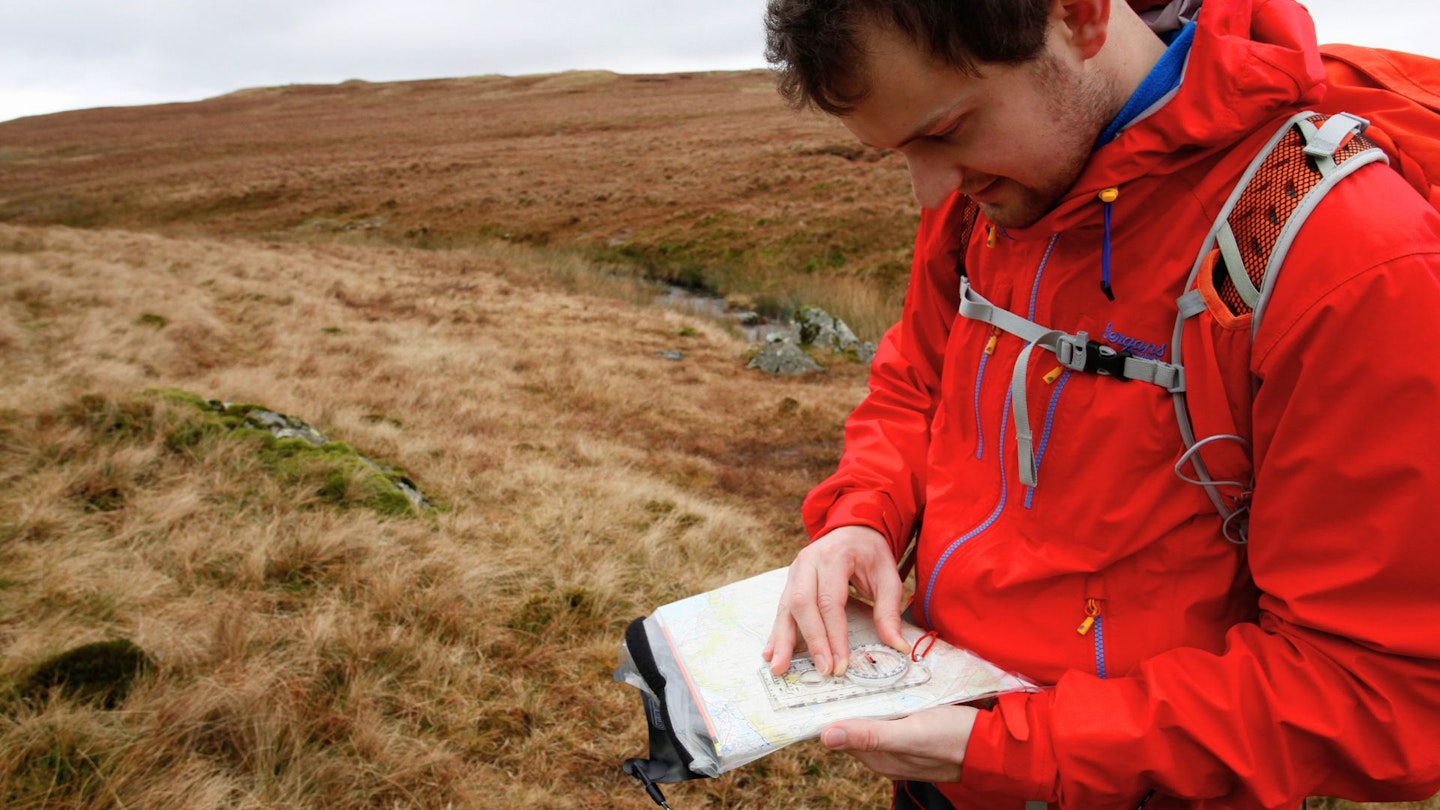
When following a route, be sure to look around and checking the map frequently, ticking off the collecting features you expect to see, and watching for upcoming junctions or turns.

Keep track of where you are by thumbing the map – tracking your position across a folded map with your thumb as you move.
When you’re confident of following a route using linear features like paths and fences, the next step is to use compass bearings. This is vital if you’re walking off-path over open ground, but it can also confirm you’re following the right path or handrail feature.
In terms of speed, you can calculate this by using speed = distance ÷ time. You can estimate how long you’ll take by rearranging the formula to time = distance ÷ speed. But you must also factor in the type of terrain and elevation gain.
Key takeaways: 10 top tips to read a map like a pro
DO orient the map.
That means turning it so that north on the map points to north on the ground, no matter what direction you are facing. You don’t need a compass for this. Instead, align it with hill shapes and rivers.
DO rely on the lie of the land.
Geological features like summits, valleys and ridgelines will not change – at least not quickly – and are your most dependable points of reference.
DO learn what scale looks like.
It can be easy to over or underestimate height and distance on the map. To counteract that, make a note of what a 100m or 10m prominence looks like when you’re standing in front of it. Same for distance.
DO pay attention to contours.
Be particularly mindful of missing contour lines which can be mistaken at a glance for a more gentle slope but actually mean the gradient is very severe.
DO collect features.
It’s hard to keep all the details of a route in mind at once so, instead, break it into legs, identify features you’ll see along the way and make a note of them as you pass. For example, stream crossings, fence lines or crags. It will help you quickly pinpoint your location on the map.
DO keep an eye on the time.
Knowing how long you’ve been walking can help you isolate your location on the map. Naismith’s rule uses the formula of 5kph (or whatever speed you usually walk at) on the flat plus 10m per 100m height gained. It’s simplistic, but a good starting point for estimating timings.
DO get it out!
Make a habit of poring over the map at home and while out on the hill, seeing how it relates to the terrain around you. It’s geeky fun and will help build familiarity.
DON’T forget the hidden features
There are some things your map won’t show. This can include vegetation, uneven ground and crags up to 9m, which won’t show up in a map with 10m contours but can be impassable on the ground.
DON’T treat human-made features as permanent.
Felled forestry may not be updated on the map, fences can be put in or taken away, buildings built or knocked down.
DON’T rely on a first glance.
It’s all too easy to convince yourself that you are where you think you are. Don’t take it for granted – check. Look once, then look again.
For some more essential navigation tips, read what to do when you get lost on a hike. If you want to take your skills a step further, you might enjoy learning how to use the stars to navigate.
Navigation manuals and guides we recommend

shop.ordnancesurvey.co.uk
The authors of this guide are all part of our experienced outdoor team. Meet our team here.